In Python, creating command-line applications is common across various development and scripting tasks. The typer module, inspired by FastAPI, offers a modern approach to building CLIs with easy-to-read code. It leverages Python's type hints to create self-documenting CLIs with minimal effort.
Setting Up typer
Installation
To start using typer, you'll first need to install the module. You can efficiently do this using pip:
pip install typer
This command ensures you have all necessary tools to make your CLI functional.
Building Your First Command-Line Application
import typer

def main(name: str):
    """
    A simple CLI that greets the user.
    :param name: Name of the user
    :return: None
    """
    typer.echo(f"Hello {name}")

if __name__ == "__main__":
    typer.run(main)
In this example, typer automatically generates a CLI interface that takes a name and prints a greeting. The typer.run() function simplifies execution by handling argument parsing and program execution seamlessly.
Run the application with:
python greeter.py John
The output:
Hello John
Adding Options and Arguments
typer allows you to easily add both options and arguments:
import typer

def main(name: str, repeat: int = 1):
    """
    Greets the user by name, multiple times if specified.
    :param name: Name of the user
    :param repeat: Number of repetitions
    :return: None
    """
    for _ in range(repeat):
        typer.echo(f"Hello {name}")

if __name__ == "__main__":
    typer.run(main)
You should run the application like this:
python greeter.py John --repeat 3
This command will print "Hello John" three times. In this setup, name is a positional argument, and repeat is an optional flag that specifies the number of repetitions.
Hello John
Hello John
Hello John
Advanced Example: Calculator
Creating a more complex CLI is simple with typer. Let's build a basic calculator:
import typer

def add(x: float, y: float):
    """Add two numbers."""
    typer.echo(f"Result: {x + y}")

def subtract(x: float, y: float):
    """Subtract two numbers."""
    typer.echo(f"Result: {x - y}")

def multiply(x: float, y: float):
    """Multiply two numbers."""
    typer.echo(f"Result: {x * y}")

def divide(x: float, y: float):
    """Divide two numbers."""
    if y == 0:
        typer.echo("Error: Division by zero is not allowed.")
        return
    typer.echo(f"Result: {x / y}")

app = typer.Typer()
app.command()(add)
app.command()(subtract)
app.command()(multiply)
app.command()(divide)

if __name__ == "__main__":
    app()
You can use the calculator via the following commands:
python calculator.py add 3 5
python calculator.py subtract 10 4
python calculator.py multiply 6 7
python calculator.py divide 8 2
This setup allows for an intuitive command-line interface, where users can easily perform basic arithmetic operations.
Typing and Default Values
The efficacy of typer is enhanced by leveraging Python's type hints, ensuring type safety across applications. By defining function parameters with type hints, typer automatically validates input, reducing potential errors due to incorrect data types. You can also provide default values easily:
import typer

def greet(name: str, greeting: str = "Hello"):
    typer.echo(f"{greeting}, {name}!")

if __name__ == "__main__":
    typer.run(greet)
Running python greet.py "John Doe" uses the default greeting "Hello," but you can customize it as needed.
Printing with Colors
typer provides utility to print colored text in the terminal to enhance output readability and engagement.
import typer

def greet_with_color(name: str):
    typer.secho(f"Hello {name}", fg=typer.colors.BRIGHT_RED, bg=typer.colors.BRIGHT_YELLOW, bold=True)

if __name__ == "__main__":
    typer.run(greet_with_color)
In this example, typer.secho() is used to print the greeting in bright red text on a bright yellow background, with the text bolded.
You can customize your CLI output further using additional typer.colors options like RED, GREEN, BLUE, and more for both text and background colors.
import typer

def display_message():
    typer.secho("Success!", fg=typer.colors.GREEN, bold=True)
    typer.secho("Warning!", fg=typer.colors.YELLOW, bold=True)
    typer.secho("Error!", fg=typer.colors.RED, bold=True)

if __name__ == "__main__":
    typer.run(display_message)
This function showcases different colored messages based on the severity or nature of the message.
Interactive Prompts and Responses
typer supports interactive user prompts to gather input step-by-step and respond meaningfully using colors:
import typer

def main():
    typer.secho("\nWelcome to the Simple Registration CLI!", fg=typer.colors.CYAN, bold=True)
    typer.secho("=" * 50, fg=typer.colors.CYAN)

    full_name = typer.prompt("\nWhat's your full name?")
    age = typer.prompt("How old are you?", type=int)
    email = typer.prompt("What's your email address?")

    typer.secho("\nProcessing your information...\n", fg=typer.colors.BRIGHT_BLUE)

    typer.secho(f"Thank you, {full_name}!", fg=typer.colors.GREEN, bold=True)

    if age < 18:
        typer.secho("Note: Registration requires guardian consent as you are a minor.", fg=typer.colors.YELLOW, bold=True)
    else:
        typer.secho("You are eligible for full access.", fg=typer.colors.GREEN, bold=True)

    confirm_signup = typer.confirm("\nDo you want to complete your registration?")
    if confirm_signup:
        user_data = {
            "Name": full_name,
            "Age": age,
            "Email": email
        }
        typer.secho(f"\nRegistration successful for {full_name}!", fg=typer.colors.GREEN, bold=True)
        typer.secho(f"\nSummary of your details:\nName: {user_data['Name']}\nAge: {user_data['Age']}\nEmail: {user_data['Email']}", fg=typer.colors.CYAN)
    else:
        typer.secho("Registration cancelled.", fg=typer.colors.RED, bold=True)

if __name__ == "__main__":
    typer.run(main)
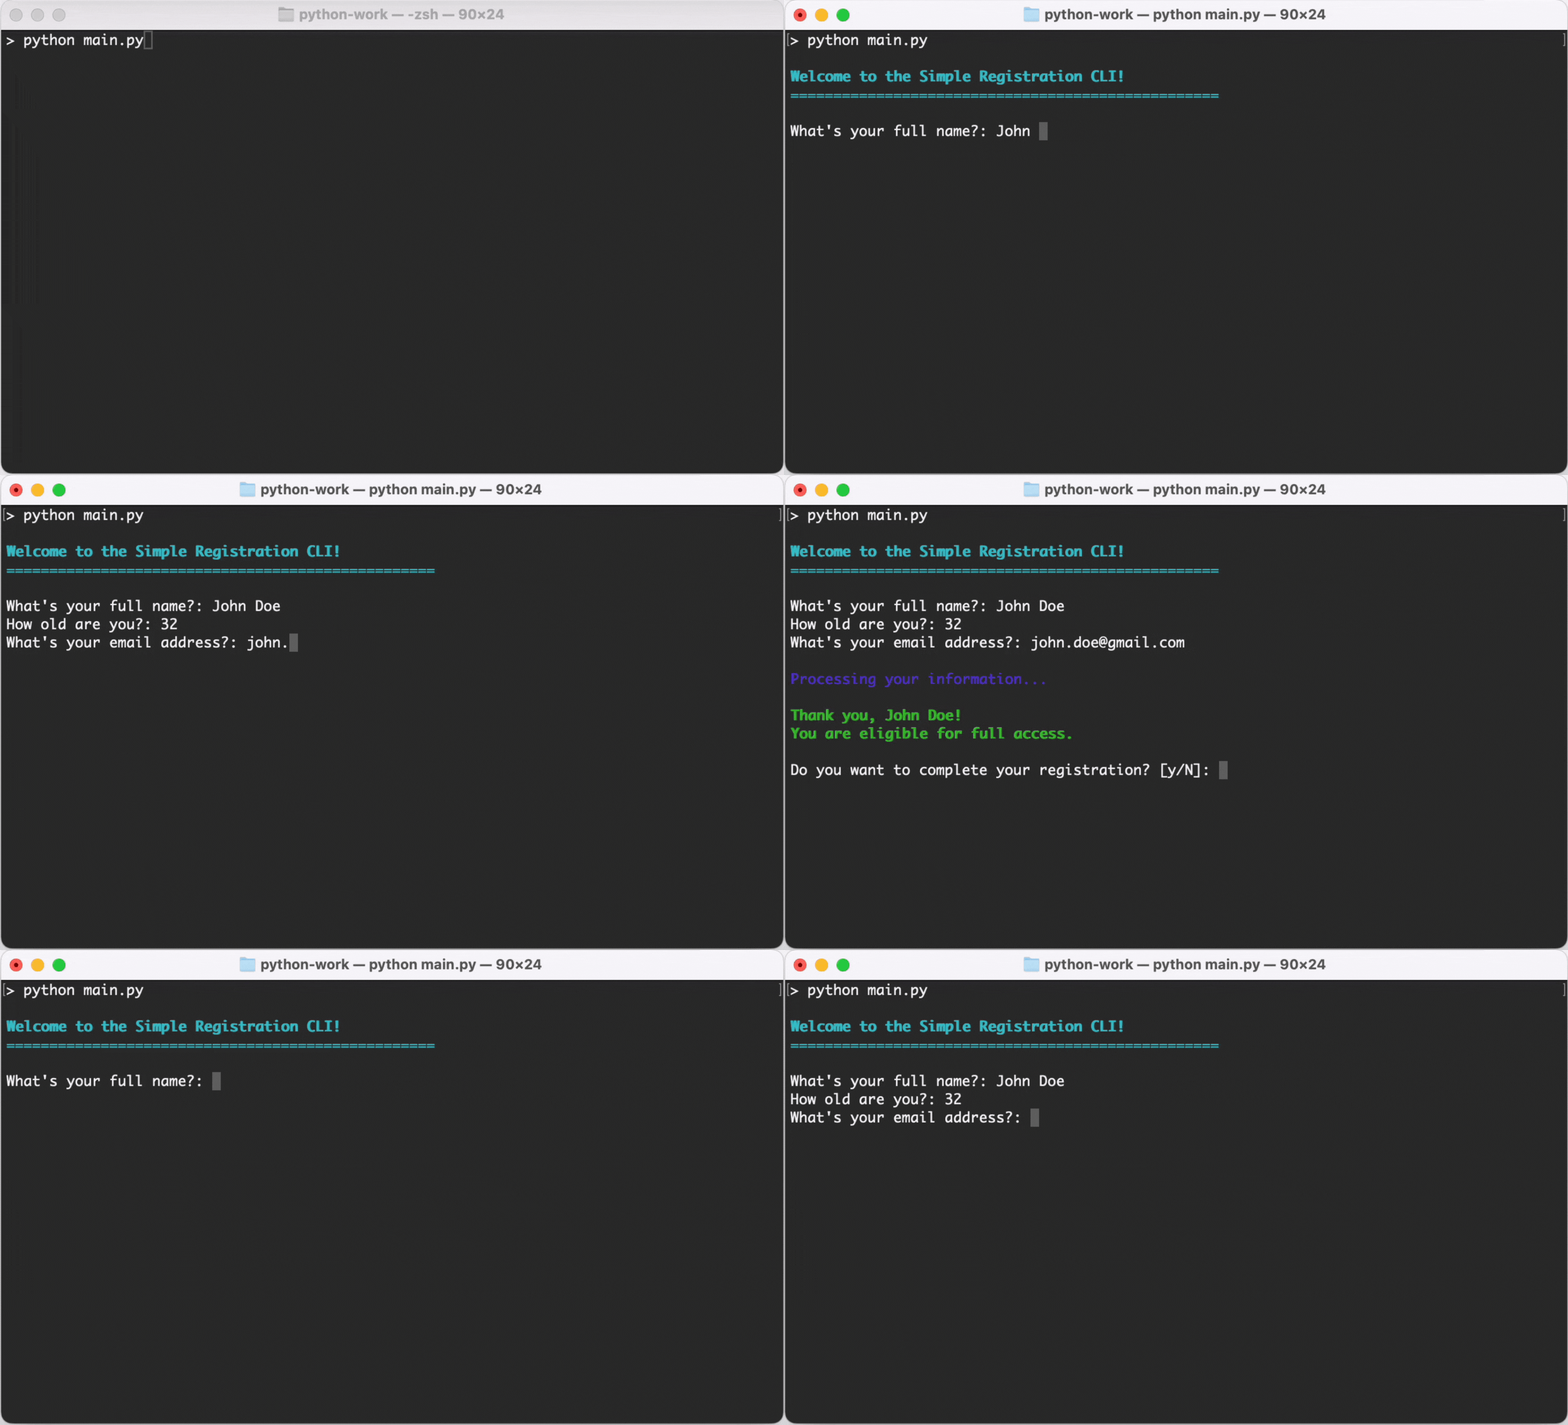
This enhanced example takes the user through a registration process by asking for their name, age, and email address. Utilizing prompts and colored outputs provides a clear and engaging experience. If registration is confirmed, a summary of the user's data is printed out.

Enhancing CLI Output with the rich Library
The rich library is used to render styled text, tables, markdown, and more directly into the terminal. It's incredibly useful for enhancing the interactivity and presentation of command-line applications. To use it alongside typer, you'll need to install it first:
pip install rich
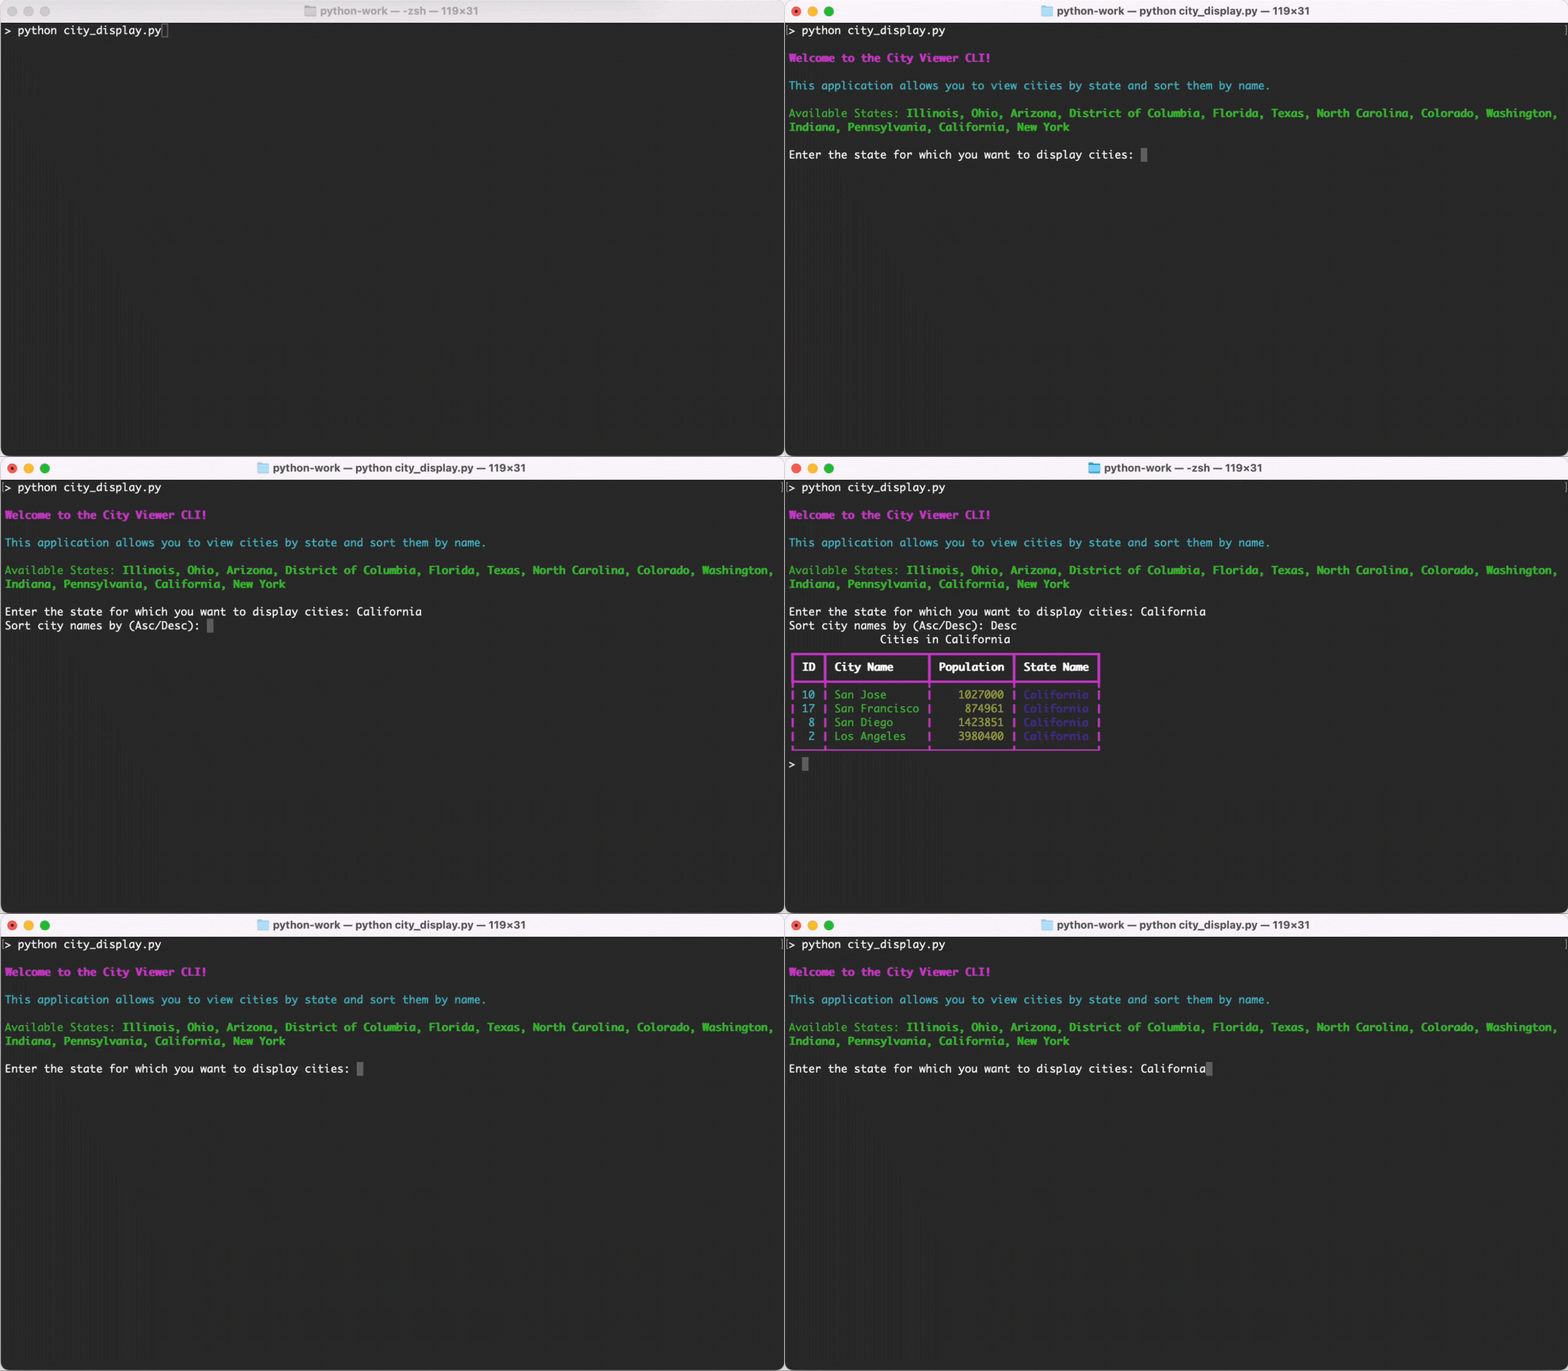
Below is an example of a CLI that prompts the user to select a state and a sorting order for city names, then displays the information styled as a colorful table:
cities_data.py:
cities_data = [
    {"id": 1, "name": "New York", "population": 8419000, "state": "New York"},
    {"id": 2, "name": "Los Angeles", "population": 3980400, "state": "California"},
    {"id": 3, "name": "Chicago", "population": 2716000, "state": "Illinois"},
    {"id": 4, "name": "Houston", "population": 2328000, "state": "Texas"},
    {"id": 5, "name": "Phoenix", "population": 1690000, "state": "Arizona"},
    {"id": 6, "name": "Philadelphia", "population": 1584200, "state": "Pennsylvania"},
    {"id": 7, "name": "San Antonio", "population": 1547200, "state": "Texas"},
    {"id": 8, "name": "San Diego", "population": 1423851, "state": "California"},
    {"id": 9, "name": "Dallas", "population": 1341000, "state": "Texas"},
    {"id": 10, "name": "San Jose", "population": 1027000, "state": "California"},
    {"id": 11, "name": "Austin", "population": 995484, "state": "Texas"},
    {"id": 12, "name": "Jacksonville", "population": 949611, "state": "Florida"},
    {"id": 13, "name": "Fort Worth", "population": 942323, "state": "Texas"},
    {"id": 14, "name": "Columbus", "population": 907971, "state": "Ohio"},
    {"id": 15, "name": "Indianapolis", "population": 876384, "state": "Indiana"},
    {"id": 16, "name": "Charlotte", "population": 873570, "state": "North Carolina"},
    {"id": 17, "name": "San Francisco", "population": 874961, "state": "California"},
    {"id": 18, "name": "Seattle", "population": 753675, "state": "Washington"},
    {"id": 19, "name": "Denver", "population": 715522, "state": "Colorado"},
    {"id": 20, "name": "Washington", "population": 701974, "state": "District of Columbia"},
]
city_display.py:
import typer
from rich.console import Console
from rich.table import Table
from cities_data import cities_data

app = typer.Typer()
console = Console()

@app.command()
def display_cities():
    console.print("\n[bold magenta]Welcome to the City Viewer CLI![/]\n", style="bold magenta")
    console.print("This application allows you to view cities by state and sort them by name.\n", style="cyan")

    available_states = {city['state'] for city in cities_data}
    console.print(f"Available States: [bold green]{', '.join(available_states)}[/]\n", style="green")

    state = typer.prompt("Enter the state for which you want to display cities", prompt_suffix=": ", show_default=False)

    order = typer.prompt("Sort city names by (Asc/Desc)", prompt_suffix=": ", show_default=False).lower()

    if order not in ["asc", "desc"]:
        console.print("[bold red]Invalid sort order entered. Please enter 'Asc' or 'Desc'.[/]")
        return

    filtered_cities = [city for city in cities_data if city["state"].lower() == state.lower()]

    sorted_cities = sorted(filtered_cities, key=lambda x: x["name"], reverse=(order == "desc"))

    if not sorted_cities:
        console.print(f"No cities found for state: [bold red]{state}[/]", style="bold red")
        return

    table = Table(title=f"Cities in {state}", style="bold magenta")

    table.add_column("ID", justify="right", style="cyan", no_wrap=True)
    table.add_column("City Name", style="green")
    table.add_column("Population", justify="right", style="yellow")
    table.add_column("State Name", style="blue")

    for city in sorted_cities:
        table.add_row(
            str(city["id"]),
            city["name"],
            str(city["population"]),
            city["state"]
        )

    console.print(table)

if __name__ == "__main__":
    app()
Run the application with:
python city_display.py
This command-line application uses both typer and rich to create a sophisticated interface where users can specify a state and sorting preference to view city data. The cities are displayed in a visually appealing, colorful table format. The table includes columns for city ID, name, population, and state, making it easy to compare information at a glance. This enhanced presentation not only improves user experience but also makes data interaction more engaging and informative.

Conclusion
Python's typer module streamlines the process of building effective and user-friendly CLIs by leveraging type hints and intuitive decorators. Whether you're developing simple scripts or complex command-line applications, typer offers a modern, efficient solution that enhances both user experience and developer productivity. By exploring these examples and implementing them in your projects, you can harness the power of typer to build robust and feature-rich command-line interfaces.
